Monday 25 August 2014

Lightbox Completed

So after 24 hours of solely focusing on my lightbox, I have completed it and finished my assignment. The photos I have taken have turned out pretty average - they looked better on my camera but oh well it's done which means my assignment is done too!


Constructing my Corflute Design to my Lightbox

So I have laser cut my corflute design after a few test runs. I started off making a few boxes at the edge of my corflute so I could test the depth and how fine each cut was. When I was reasonably happy with how my tests turned out, it was time to laser cut my design..

These are the settings that I have used for my laser cut on corflute. Any red lines (engraving) are cut at 12.5% power, 10% speed and a focal depth of 3mm. Any blue lines (to cut through the material) are cut at 80% power, 10% speed and a focal depth of 3.5mm.
My design being cut by the laser cutter. 
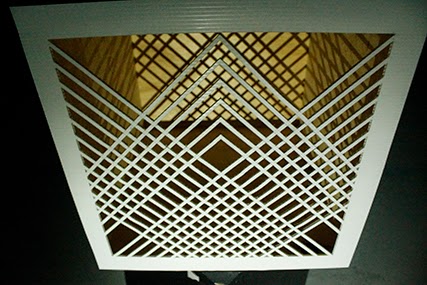
Finished. It has worked perfectly as I planned in the fact that I coloured my lines right so I haven't cut any sections out where they needed to be rastered or vice versa.
I have decided to laser cut my design again on another piece of corflute to a couple of reasons. Firstly the blue line settings that I set up above cut the shapes however there were tabs still left on so they wouldn't fall out. This has meant that I grabbed a scalpel and have cut the tabs on each shape. However, this method was taking far too long whereas it was 9 minutes to laser cut my design. The other reason that I have decided to recut my design is because my red engraved lines were engraved a little too deep so the structural integrity of my design was iffy.

I have gone back to the laser cutter and have undertaken a lot more tests in order to get these settings exactly how I want them. For it to come out perfectly, I have altered the settings so that they read: red - 7% power, 10% speed and a focal depth of 3mm. Blue - 85% power, 6% speed and a focal depth of 3.5mm. When I picked up my design from the laser cutter after it had finished, all the cut through shapes just fell out exactly how I had hoped they would. No need for the scalpel.
A couple of images as my design was being cut for the second time.
Now that I have my design laser cut, I have to think about how I will attach it to the rest of my lightbox. I have decided that hot glueing it would hopefully be the best option to avoid potentially cracking the corflute - if I was to use screws for example. An idea Ash in the workshop suggested, was that I drill holes into the box at about 5mm deep in order to get more glue in and make the join a lot stronger. So I have done just that. 

A couple of images showing a test of the hot glue method in use. If it is applied well and evenly, The bond is quite strong as you can see from the images - these images were taken only about one minute after application.

Corflute Laser Cutter File

In order to manipulate the light and thus create this to be a lightbox, I have decided to use the corflute and then laser cut a pattern into it. Because I have used a 'chicken wire' rendition throughout my model, I have decided to play off that idea and create a basic shape that casts similar shadows. I have quickly mocked this design up that will cast shadows from a vast range of different forms.

Parallel perspective looking down on the design I have made for laser cutting onto the corflute. If I can cut this well, and everything works out like I hope, I am excited for how my lightbox will turn out tomorrow!
Perspective of the design.
I have then exported my design as a .dwg file so that I can open it with Illustrator and start editing the line colours to the specifications of the laser cutter. Blue to cut through, red to engrave and black to raster. I have then changed the stroke weight to the 0.1pt so that my file is good to go first thing tomorrow morning when I get into the workshop.

I have imported the .dwg file of my design into the laser cutter file and scaled it accordingly. All I need to do now is do some test cuts to see how the cardboard settings work for corflute - due to the fact that there is no preset for corflute.. After I cut this design out, then its just a case of fixing it to my lightbox and I'll be all done :)

Light Box Joining Test

Being sick for a week and a bit during this project with tonsillitis, I have fallen behind in the fact that I did not complete my lightbox by the hand in date of 12 August. Since I have finished my poster I am using what time I have left before 5pm tomorrow - 26 August to finish off my lightbox for final hand in. I have cut my material pieces to size and I am considering different joining techniques of how I could then obviously join it together to make my cube. Due to time constraints - this being due tomorrow, I need to do a join that is reasonably quick. I wanted to do dove tails and / or finger joins however at this late stage in the project, I simply just need to get this lightbox done and hand it in. 

Therefore I have been considering the biscuit join technique however I feel as though it is not strong enough unless you make several biscuit cuts. I have talked to the guys in the Threedee workshop and I was suggested that I look into PVA glue and then use pins to put the box together. For what it is worth, yes there will be pin heads on my exterior faces, however it is a small price to pay for the time savings I would get by using this technique. 

I have grabbed a couple of scrap pieces and have tested how the pin technique looks like and the strength that it has. I have not used PVA glue as well in this test, which when used will hold it together even tighter..


Apart from the odd pin that I shot in accidentally on an angle, each pin hit its mark. It creates a reasonably strong join - the more I use, the stronger it gets, however if enough stress is put on it, one can pull the pieces off one another. This would not happen though so it's not really a concern. It is simply just a case of getting the two pieces flush against each other very tight before pinning so it is a lot stronger. One issue we had though, was when putting the pin into the cork from the plywood, if the pins were too close to one another, the cork could split.. This is just something to be mindful of when putting my lightbox together. Otherwise, if lined up well, this can create a nice flush finish with a reasonable amount of strength. 

Friday 22 August 2014

Final Poster - Submission

Following my presentation / critique that we did on Tuesday, I got feedback that I needed to change a few elements in my design and fix up the presentation of my poster for final submission. What I have ended up with is a design that I am quite happy with even with all of the set backs that I have had during this assignment.

"I have designed my retail store with a minimalistic aesthetic in mind. Peeling back all of the detail to create a store this is solely focused on the craftsmanship of each individual shoe. By designing my store around my spatial generator word recess, I have designed a store that is functional and makes the most of the space available by recessing into the ground below. Following a lot of refinement I am pleased with the final design of the store and I feel that it would be a unique shopping experience for any man interested in high end casual footwear."

I am not sure why but when I upload an image of my final poster to this blog, the colours change.. Unfortunately I have had to use a screenshot of my final poster which is below:


Final Edited Images - Post Feedback

Following refining my model like I was advised to do by Ant, I have had to re-edit my images in order to render them with a consistency for use on my final poster. I have decided to render them slightly differently from the ones that I used in my poster for presentation my using the live trace function in Illustrator before editing them in Photoshop afterwards. I will admit that this method makes my design a little harder to decipher, however the effect that is created is interesting and with limited time, was a good option instead of editing my images by hand for example. 

The views from my model live traced in Illustrator are as follows:
Long section.
Sectional perspective.
Floor plan at one metre of the ground.
Floor plan with the ceiling removed in order to get the light fixtures for my reflective floor plan.
Front elevation.
Perspective of 'dugout' fitting area.
Exterior perspective
Perspective of glass door entrance - view from Tory street.
Perspective of new glass balustrade looking through the store and onto Tory Street.


After I lived traced each of my images in Illustrator, I imported them into Photoshop where I began to edit and layer them to create the following images that I will be putting onto my final poster..